Tuesday 7 August 2012

Software to record any sound from your PC


I had earlier mentioned about Freecorder which is a browser-based audio grabbing tool. My friends and readers have told me that the program works good but it eats up their viewable space in the browser.

So, for all of you I am here with a software which can record any sound that you can hear from your PC. Its called MP3 MyMP3 Recorder. It is indeed a free software and it can save the audio in wav and mp3 formats.


Check the following link for the software. 

http://www.mp3mymp3.com/mp3_my_mp3_recorder.html


That's it!
Feel free to rate,comment & subscribe.Thanks!

Saturday 28 July 2012

Command Prompt on Right-Click


Many computer users, specially the programmers, need to launch a command prompt window every once in a while to execute some dos/shell commands. The problem is, when a command prompt window launched, the default path is normally the system path or the user profile's path. The users will then have to do all the "cd" commands to change the directories to the path he/she wants.
This trick shows you how to add an option called "Command Prompt" when you right-click on a folder in Windows. With this option, a Command Prompt Window will launch and its current directory will be the path to the folder you've selected.
Use this trick at your own risk.
Here's what you'll get:


The Solution
You can either edit your registry OR download the registry file and apply it on your computer.
Method I. Manually edit the registry:
  1. Start > Run
  2. Enter "regedit" and hit Enter
  3. Expand to "HKEY_LOCAL_MACHINE\SOFTWARE\Classes\Folder\shell"
  4. Right-click on "shell" and select New > Key
  5. Make sure a new key is created under "shell". Change the name of this key to "Command Prompt"
  6. Right-click on this new key "Command Prompt" and select New > Key
  7. Change the name of this key to "command"
  8. Here's what we should have: 
  9. Double-click on the "(Default)" text on the right window to bring up the edit box
  10. Enter this text into the Value Data field:
    cmd.exe "%1"
  11. Click OK and close the registry.
Method II. Download and apply the registry file:
  1. Download this registry file Here
  2. Unzip it to a temp folder, then double-click on the .reg file to add the registry data.
That's it.
I hope you'll like this trick.
Feel free to rate,comment & subscribe.
Thanks!

Friday 27 July 2012

How To Untag Yourself From a Photo on Facebook


Your friend recently posted a picture on Facebook and tagged you on it. That’s nice! But what if that is the picture you don’t like? It will appear in your pictures on Facebook whether you like it or now. There is only one way to get rid of this issue. Untag yourself from that picture.

How To Remove Tag From a Picture on Facebook

remove tag facebook untagGo to your Profile page. Then click on the View Photos of Me link under your profile pic. Locate the picture that you don’t like in it. Then click it. Under this photo, there will be a list of all the people who have been tagged in it. Find out your name in it, and then click on the remove tag link in the brackets. That’s it. You have just untagged yourself from a photo and it will no longer appear in your pictures.
[Note that after you have untagged yourself from a picture, the picture will still be there in your friend's album. It will just not appear in your pictures]

That's all.
I hope you'll like this trick.
Feel free to rate,comment & subscribe.Thanks!

How To Disable / Stop the Facebook Chat Sound


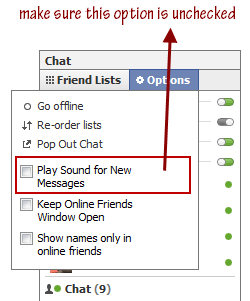
stop facebook chat soundRecently Facebook changed the chat message notification sound. The new ‘ding’ sound is really annoying sometimes. But you can easily disable the Facebook chat sound.
To stop the Facebook chat notification sound, click on the “Chat” link in the bottom right corner on your Facebook home page. In the pop up chat window, click on the “Options” link.
In the Options menu, uncheck the option that says, Play Sound for New Messages. That’s it. Now you will never hear the pop up chat sound.
To enable the Facebook chat sound again, just check the “Play Sound for New Messages” option again.


That's all.
I hope you'll like this trick.
Feel free to rate,comment & subscribe.Thanks!

How To Hide Your Birthday on Your Facebook Profile


If you are uncomfortable with the fact that your date of birth is publicly visible on Facebook, then you can easily hide it from your Facebook profile. You can also hide just the year of your birth and display only the date if you don’t want everyone to know your age. Here’s the procedure to hide your birthday on Facebook.
1. Login to your Facebook account and go the edit profile page.
2. In this page, the basic information tab will be selected by default. Here, look for the Birthday option. There are three options available in the drop down menu there,
  • Show my full date of birth in my profile
  • Show only month and date in my profile
  • Don’t show my birthday in my profile
These options are self explanatory. Choose the one you like most but since you came here looking for the method to hide your birthday on Facebook, just select ‘Don’t show my birthday in my profile’ option.
hide birthday facebook
Once you are done, scroll down and click on the ‘Save Changes’ button. That’s it. Now your birthday will not be displayed publicly (not even to your Facebook friends).
That's it.
Feel free to rate,comment & subscribe.Thanks!

Who Deleted You From Their Friends List on Facebook?


Do you want to know who removed you from her/his friends list on Facebook? You may have come across many Facebook apps that claim to tell you who deleted you from their friends list. But the truth is that none of them actually work. They are all fake/scams as it is against Facebook TOS for app developers to monitor friends. Facebook will immediately suspend any app that tries to tell you who removed you as a friend.
The only way to monitor this is to do this outside Facebook. Fortunately, there is a way, the Facebook Unfriend Finder. Unfriend Finder is a script that helps you monitor people who have deleted you from their friend list. Installation of this script is very easy. You can see the instructions for all the browsers here.
I recommend using Firefox with greasemonkey and using Unfriend Finder as a greasemonkey script. Learn all about installing and using greasemonkey scripts on firefox, and then download Unfriend Finder and install it in Firefox.
After the installation, you will see a new menu, Unfriends, on Facebook.
facebook unfriend find who deleted you as friend
You won’t see anything when you click on this menu option now. But rest assured that it has started to monitor your friends. If you see a drop in your friends count after you have installed this script, then click on the Unfriends to see who has removed you as friends.
I hope you'll love this post.
Feel free to rate,comment & subscribe.Thanks!

Complete Guide to Installing and Using Greasemonkey Userscripts in Firefox


greasemonkey logoGreasemonkey is a Firefox add-on/extension that allows you to install userscripts that alter the web pages on the fly when you visit them. There are innumerable uses of Greasemonkey. It can be used to fix rendering bugs, add new functionality to web pages, breaking captchas, aggregate data from multiple web pages etc. In this how-to Guide you’ll learn how you can start using Greasemonkey userscripts in Firefox.

Installing Greasemonkey in Firefox

Before installing and using userscripts, you have to first install the userscripts interpretor in the Firefox, which is the Greasemonkey add on. Here’s step by step procedure to install Greasemonkey in Firefox -
1. Go to Greasemonkey page on the Firefox add-ons site and click on Add To Firefox button.
2. A new pop up dialog box will appear on which the Install Now button will be deactivated, to prevent you from a security vulnerability. It will be activated automatically after about three seconds seconds. Click on Install Now button to start the installation of Greasemonkey.
greasemonkey installation steps3. After the installation, the installer will ask you to restart the Firefox. Click on Restart Firefox button to do this. After the Firefox starts, a confirmation dialog will be shown that 1 new add-on, that is, Greasemonkey, has been installed. Look at the lower right corner of Firefox now. You’ll notice a small monkey icon there indicating that the Greasemonkey has been installed and is ready to work.

Understanding UserScripts

The Greasemonkey plugin, by itself, does nothing. You will notice no change in the behavior of Firefox after installing Greasemonkey. All its functionality comes only after installing appropriate userscripts.
A userscript is basically a JavaScript file that ends in .user.js extension and follows some specific syntactical conventions. Every userscript is written to do a very specific purpose, when installed in Firefox, with Greasemonkey plugin installed. You can browse through thousands of userscripts at Userscripts.org.

Installing Userscripts From Web

To install a userscript in Firefox, first make sure that Greasemonkey add-on is installed (obviously). Then click on the link on the web page that points to the userscript.
For example, if you are installing user script from userscripts.org, simply click on the link that says Install,
This will open the installation dialog box of Firefox. Click on Install button to complete the installation of the userscript.
Note – On the install dialog box there are a few more things, like the include and exclude rules, the Show Script Source button etc. These things are for userscripts developers and you can use userscripts easily without knowing anything about these things. Just keep the default options selected!

Troubleshooting Userscripts’ Installation

Sometimes the install dialog box is not displayed on clicking the userscript link. In this case, one of the following cases will be applicable to you,
1. The userscript’s source code is displayed in a new tab with a pop up install button, like this,
greasemonkey pop up in firefox
If this is the case, just click on the install button on the install button pop up bar to complete the installation.
2. Sometimes, on clicking the userscripts’ link, the script simply open in a new tab with no pop up install bar, like this,
greasemonkey userscript installation
In this case, click on Tools > Greasemonky >Install User Script to install this userscript.

Installing Userscripts From Your Computer

You can install the userscript from web only if the URL of the installation link ends with .user.js extension. If it doesn’t ends with this extension then the Greasemonkey plugin will not detect this script, and won’t display any of the installation options described above.
If this is the case, then save the userscript on your computer (File > Save As) and rename it as anyNameYouLike.user.js. Then right click on the file and click on Open With > Firefox. If you are on Linux, then just open this script using the File > Open dialog of Firefox, and click on the install button on the pop up bar to finish the installation.
Again, like above, if the pop up bar with an install button doesn’t appears, then click on Tools > Greasemonky > Install User Script to install this userscript.
Now that you know all about installing and using Greasemonkey userscripts in Firefox, visit Userscripts.org to check out all the available userscripts. If you don’t want to browse through the thousands of available userscripts, then just subscribe to Hacktrixto get notified about really cool userscripts, whenever they are released.